Datapool
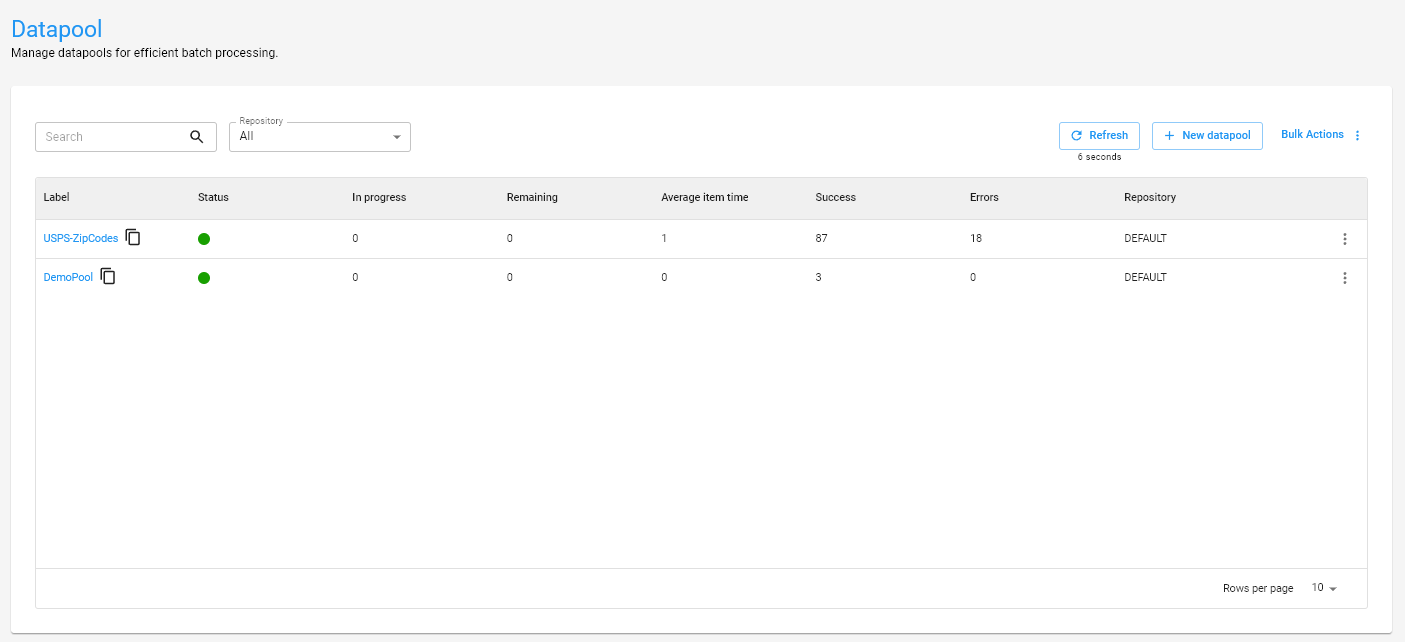
Go to DatapoolUsing Datapools, you will be able to manage batch processing of items efficiently.
Datapool can be considered a queue manager, allowing us to have control and granularity over the items that need to be processed.
In the following sections, you will find details about how a Datapool works and how to use this functionality in your automation processes.
Creating a Datapool
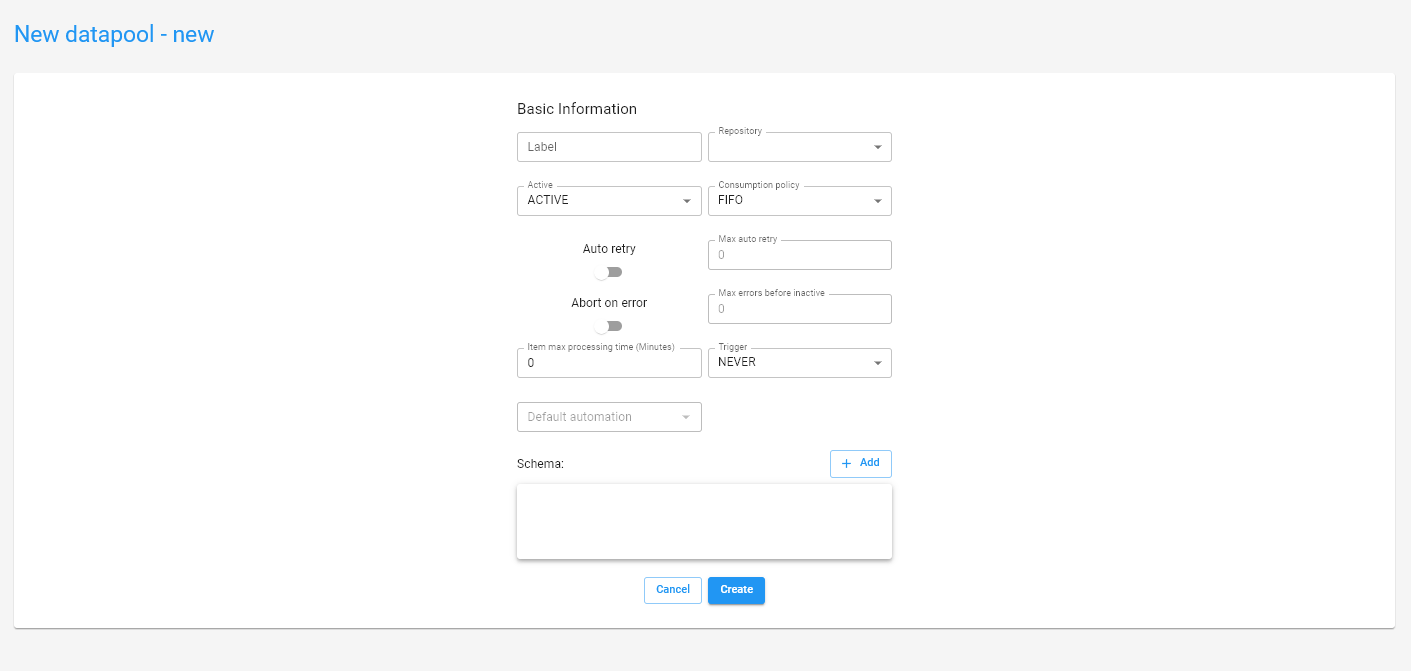
To create a new Datapool, click on + New Datapool and fill in the following fields:
- Label: The unique identifier that will be used to access the Datapool.
- Active: If
ACTIVE, the Datapool will be available to be accessed and consumed. - Consumption policy: You can choose between two consumption policies:
- FIFO: The first item to be added to the Datapool will also be the first item to be processed.
- LIFO: The last item to be added to the Datapool will be the first item to be processed.
- Auto retry: If enabled, an item can be automatically reprocessed in the event of an error.
- Max auto retry: The maximum number of attempts for an item to be processed successfully.
- Abort on error: If enabled, the Datapool becomes inactive and is no longer consumed in the event of consecutive errors.
- Max errors before inactive: Maximum number of consecutively processed items with an error that will be tolerated until the Datapool becomes
INACTIVE.
- Max errors before inactive: Maximum number of consecutively processed items with an error that will be tolerated until the Datapool becomes
- Item max processing time (Minutes): Expected time for a Datapool item to be processed under normal conditions.
- Trigger: You can define whether the created Datapool will also be responsible for triggering new tasks:
- ALWAYS: Whenever a new item is added to the Datapool, a new task for a given automation process will be created.
- NEVER: Datapool will never be responsible for triggering tasks from an automation process.
- NO TASK ACTIVE: Whenever a new item is added, Datapool will trigger a new task from an automation process only if there are no tasks from that process being executed or pending.
- Default automation: The automation process that Datapool will use to trigger new tasks if any trigger is being used.
- Schema: The fields that will make up the structure of a Datapool item. You can add new fields to the schema by clicking
+Addand defining a label and the expected data type.
Adding new items to the Datapool
We can add new items to the Datapool in two different ways.
Tip
Explore the  to get code examples that facilitate datapool manipulations, access and learn how to consume items from a datapool, manipulate a datapool item, datapool operations and adding new items via code.
The generated snippets are available in languages Python, Java, JavaScript, and TypeScript.
Adding each item manually
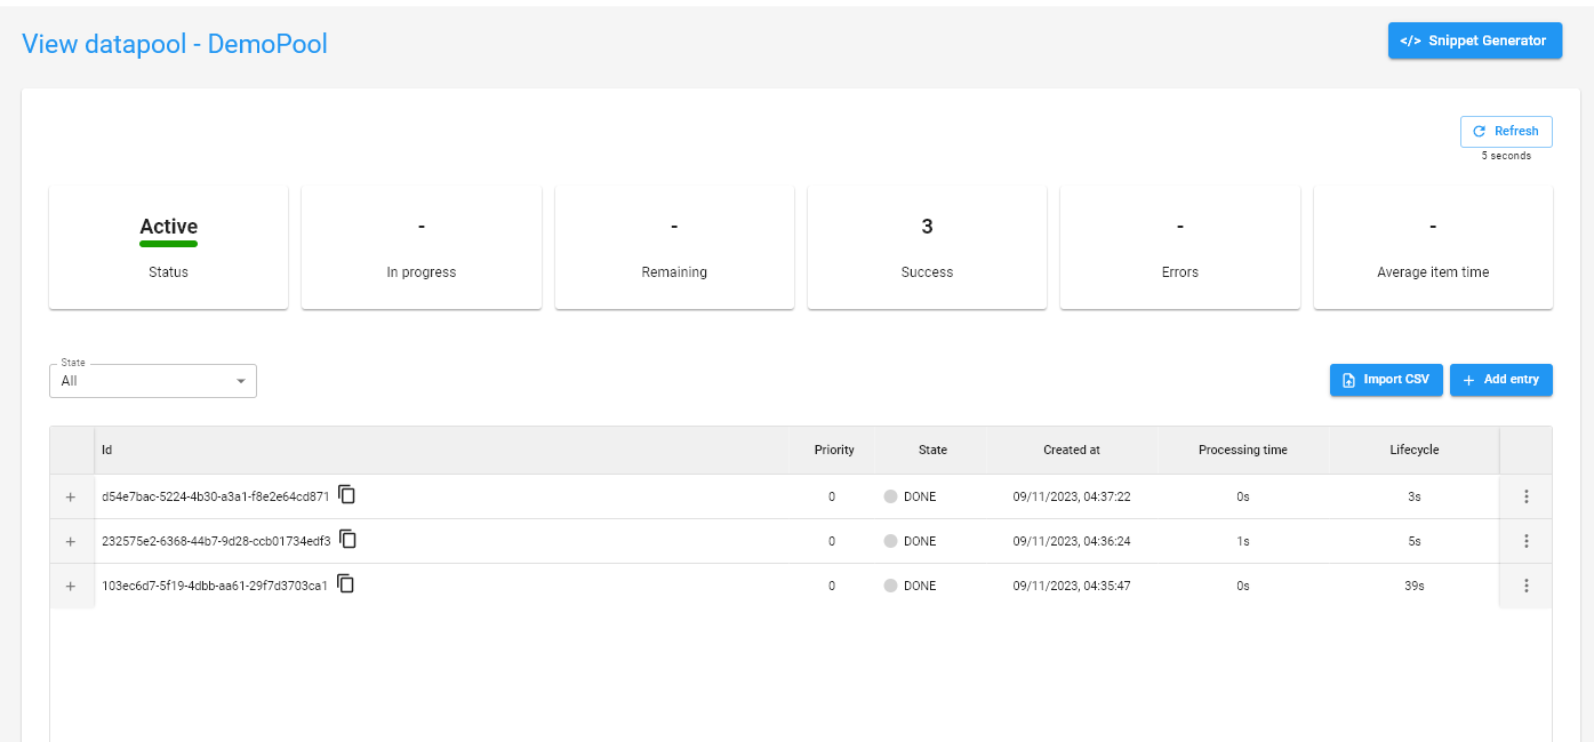
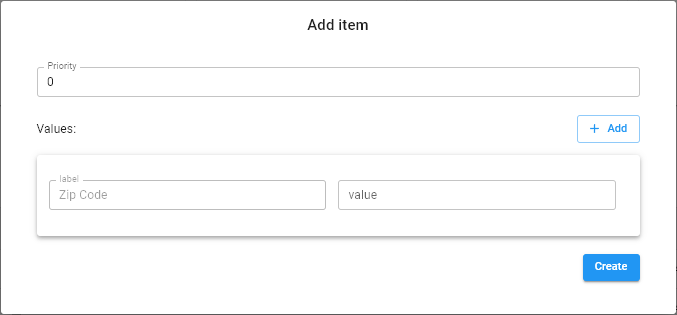
By clicking on + Add entry, we can add a new item to the Datapool. We can fill in what the priority of this specific item will be and also the values that this item receives.
In addition to filling in the values defined when creating the Schema, we can also add new fields containing additional data that are part of this item.
By clicking +Add within the item filling window, you can include as many additional fields as necessary for that specific item.
Adding items using a CSV file
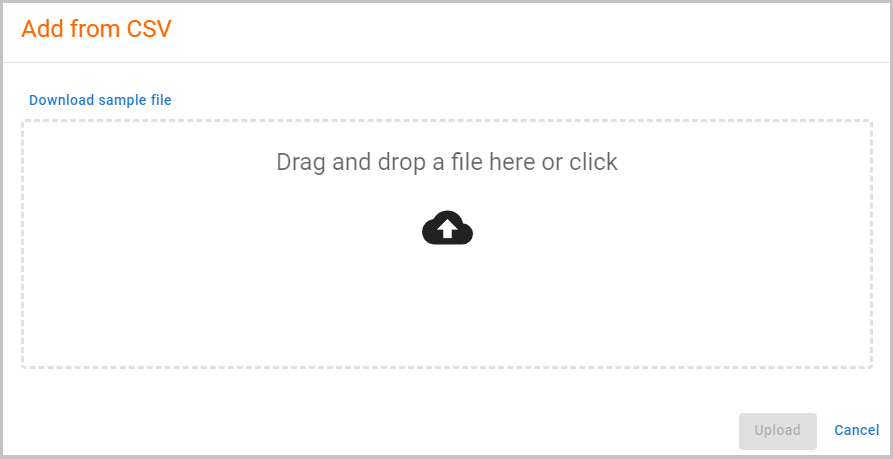
In addition to adding items manually, we can add multiple items simultaneously through a .csv file.
By selecting the Import CSV option, we can download an example file and fill it with information about the items that will be added to the Datapool.
Once this is done, upload the file and click Upload to automatically upload the items.
Important
It is possible to add items to the datapool via SDK and also via API. Learn how to perform the procedure in the desired way through the following links:
Managing Datapool items
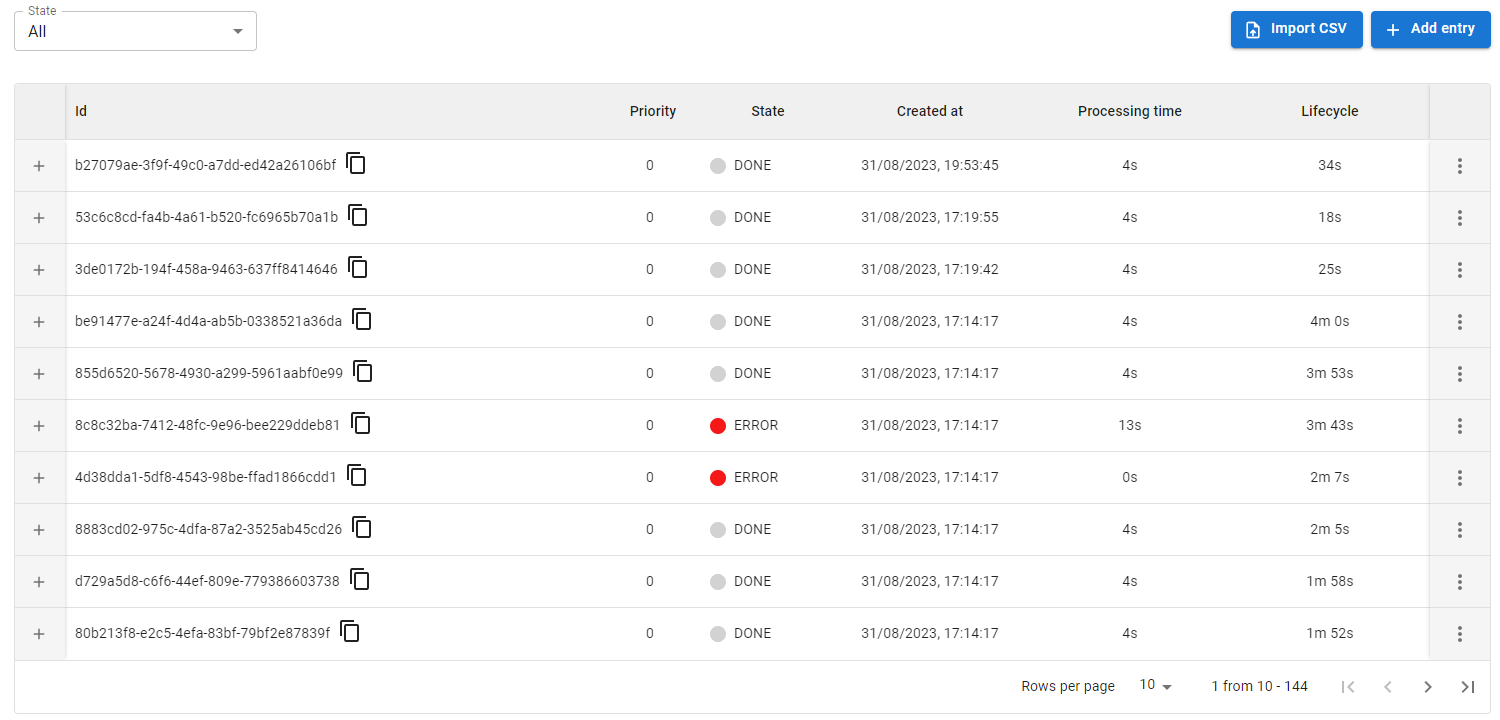
For each item added to the Datapool, we can view the following information:
- Id: The item's unique identifier.
- Priority: Priority set for the item.
- State: The current state of the item in the Datapool.
- Created at: The date the item was added to the Datapool.
- Processing time: Time spent processing the item.
- Lifecycle: The time elapsed from the creation of the item in the Datapool to the completion of processing.
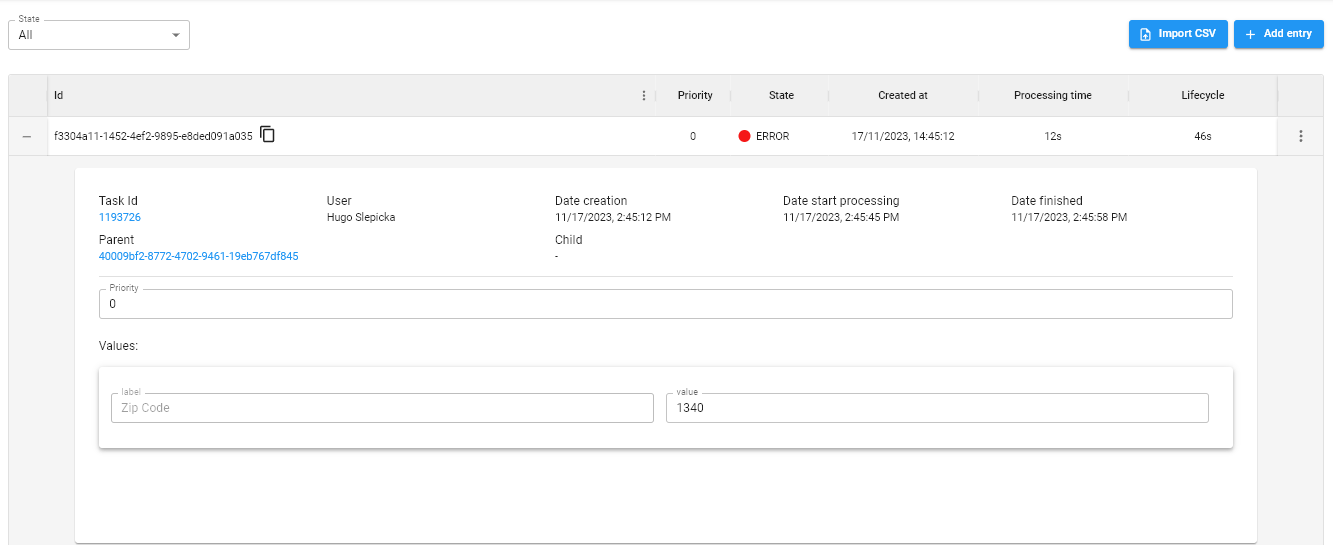
When expanding an item's details by clicking +, we can view the following additional information:
- Task Id: The identifier of the task responsible for accessing and consuming that Datapool item.
- User: The user responsible for adding the item to the Datapool.
- Date creation: The date the item was added to the Datapool.
- Date start processing: The date the item was consumed to be processed.
- Date finished: The date that processing of the item was completed.
- Parent: The parent item that this child item originated from. This information will be displayed in cases where an item is reprocessed (
retry) or when processing an item is restarted (restart). - Child: The child item that this item originated from. This information will be displayed in cases where an item is reprocessed (
retry) or when processing an item is restarted (restart). - Priority: The priority set for the item.
- Values: The key/value sets that make up the Datapool item. You will be able to view the default fields that were defined through Datapool's Schema and also add new fields by clicking
+Add.
In addition to viewing the information for each item, we can perform some operations by accessing the item's menu. You can Restart an item that has already been processed and also Delete an item that is still pending.
Important
When you restart or perform automatic reprocessing, a new item will be created in the Datapool.
These operations will never be done on the same item; instead, a "copy" of that item will be created in the Datapool that will reference the original item (Parent property mentioned previously).
Viewing item processing states
When adding a new item to the Datapool, it will initially be in the PENDING state.
We can understand the states that an item can assume during its life cycle as follows:
PENDING: The item is waiting to be processed; at this point, it will be available to be accessed and consumed.
PROCESSING: The item has been accessed for execution and is in the processing phase.
DONE: Item processing has been completed successfully.
ERROR: Item processing was completed with an error.
TIMEOUT: Item processing is in a timeout phase (this can occur when the item's finish state is not reported via code).
Reporting the state of an item
Warning
For the states to be updated in the Datapool, the processing state of each item (DONE or ERROR) must be reported via code.
If the processing state of the item is not reported via the robot code, this will be automatically considered by Datapool as a TIMEOUT state for that item.
In the following sections, we will better understand how the state of an item can be reported via code.
Understanding the TIMEOUT state
The TIMEOUT state is based on the time that was defined in the Item max processing time (Minutes) property when creating the Datapool.
If the processing of an item exceeds the defined maximum time, either due to a lack of report indicating the state of the item or some problem in the execution of the process that prevents the report from being made, Datapool will automatically indicate that the item has entered a state of TIMEOUT.
This does not necessarily mean an error, as an item can still go from a TIMEOUT state to a DONE or ERROR state.
However, if the process does not recover (in case of possible crashes) and the item state is not reported, Datapool will automatically consider the state of that item as ERROR after a period of 24 hours.
How to use Datapools with the Maestro SDK
You can easily consume and report the state of items from a Datapool using the Maestro SDK in your automation code.
Installation
If you don't have the dependency installed yet, just follow these instructions:
Importing the SDK
After installation, import the dependency and instantiate the Maestro SDK:
# Import for integration with BotCity Maestro SDK
from botcity.maestro import *

# Disable errors if we are not connected to Maestro
BotMaestroSDK.RAISE_NOT_CONNECTED = False

# Instantiating the Maestro SDK
maestro = BotMaestroSDK.from_sys_args()
# Fetching the details of the current task being executed
execution = maestro.get_execution()
// Import for integration with BotCity Maestro SDK
using Dev.BotCity;
using Dev.BotCity.MaestroSdk.Model.Execution;

// Instantiating the Maestro SDK
BotMaestroSDK maestro = BotMaestroSDK.FromSysArgs();
// Fetching the details of the current task being executed
Execution execution = await maestro.GetExecutionAsync(maestro.GetTaskId());
Processing Datapool items
# Consuming the next available item and reporting the finishing state at the end
datapool = maestro.get_datapool(label="Items-To-Process")

while datapool.has_next():
    # Fetch the next Datapool item
    item = datapool.next(task_id=execution.task_id)
    if item is None:
        # Item could be None if another process consumed it before
        break

    # Processing item...

    item.report_done()
// Consuming the next available item and reporting the finishing state at the end
Datapool datapool = await maestro.GetDatapoolAsync("Items-To-Process");

while (await dataPool.HasNextAsync()) {
    // Fetch the next Datapool item
    DatapoolEntry item = await datapool.NextAsync(execution.TaskId);
    if (item == null) {
        // Item could be 'null' if another process consumed it before
        break;
    }

    // Processing item...

    // Finishing as 'DONE' after processing
    await item.ReportDoneAsync();
}
Tip
To obtain the value of a specific field that was defined in the Schema of the item, you can use the get_value() method or pass the field label between [], using the item reference.
Complete code
from botcity.core import DesktopBot
from botcity.maestro import *

# Disable errors if we are not connected to Maestro
BotMaestroSDK.RAISE_NOT_CONNECTED = False

def main():
    maestro = BotMaestroSDK.from_sys_args()
    execution = maestro.get_execution()

    bot = DesktopBot()
    # Implement here your logic...

    # Getting the Datapool reference
    datapool = maestro.get_datapool(label="Items-To-Process")

    while datapool.has_next():
        # Fetch the next Datapool item
        item = datapool.next(task_id=execution.task_id)

        if item is None:
            # Item could be None if another process consumed it before
            break

        # Getting the value of some specific field of the item
        item_data = item["data-label"]

        try:
            # Processing item...

            # Finishing as 'DONE' after processing
            item.report_done()

        except Exception:
            # Finishing item processing as 'ERROR'
            item.report_error()

def not_found(label):
    print(f"Element not found: {label}")

if __name__ == '__main__':
    main()
using Dev.BotCity.MaestroSdk.Model.AutomationTask;
using Dev.BotCity.MaestroSdk.Model.Execution;
using System;
using System.Threading.Tasks;

namespace FirstBot
{
    class Program
    {
        static async Task Main(string[] args)
        {
            BotMaestroSDK maestro = BotMaestroSDK.FromSysArgs();
            Execution execution = await maestro.GetExecutionAsync(maestro.GetTaskId());

            Console.WriteLine("Task ID is: " + execution.TaskId);
            Console.WriteLine("Task Parameters are: " + string.Join(", ", execution.Parameters));

            // Implement here your logic...

            // Getting the Datapool reference
            Datapool datapool = await maestro.GetDatapoolAsync("Items-To-Process");

            while (await dataPool.HasNextAsync()) {
                // Fetch the next Datapool item
                DatapoolEntry item = await datapool.NextAsync(execution.TaskId);

                if (item == null) {
                    // Item could be 'null' if another process consumed it before
                    break;
                }

                // Getting the value of some specific field of the item
                string item_data = await item.GetValueAsync("data-label");

                try {
                    // Processing item...

                    // Finishing as 'DONE' after processing
                    await item.ReportDoneAsync();

                } catch (Exception ex) {
                    // Finishing item processing as 'ERROR'
                    await item.ReportErrorAsync();
                }
            }
        }
    }
}
Tip
Look at the other operations we can do with Datapools using the BotCity Maestro SDK and BotCity Maestro API.
