Orchestrating your automation
Prerequisites
- BotCity Account (Signup here)
- BotCity Studio SDK
- Python 3.7 or higher
- Java 11 or higher
Overview
Orchestration automation is possible to manage the execution of tasks in an automated way, being able to isolate tasks so that they can be executed sequentially.
BotCity Orchestrator is an automation platform used to support the development process of bots and other types of automation, deployment and orchestration of processes in runtime.
Life Cycle
The automation process contains a life cycle divided into a few steps:
- Process Preparation: the developer must know the processing flow.
- Creating the project: the developer creates the automation project, which can be in Python, Java, Javascript or Typescript.
- Developing Robot: the robot will be developed in this step.
- Deploy and Relase on Maestro: after the build is done the developer will send the robot to the platform and choose which version will be used in production.
- Creating runner: the developer will create the runner.
- Configuring BotRunner: the developer sets the
machineIdin the SDK configuration. - Creating automation: the developer will create the automation, selecting the
Runnerthat was created and the robot that was deployed. - Starting the BotRunner: the developer will start the BotRunner from the terminal.
- Creating task: the developer or the user who will be responsible for running the robot will create a task for the BotRunner to execute.
- Task execution: the BotRunner will perform the task.
Creating a project
To build a bot we need to create a project in Java, Javascript or Python structure that will be used to develop the bot.
To create a project follow the tutorials below:
-
Python project
-
Java project
-
Javascript project
Important
In addition to template projects, you can also orchestrate your own custom projects.
See more details about orchestrate custom projects.
Info
For this tutorial we will be using a Python Web Bot project.
Building your project
To send the bot to Orchestrator you need to build the project. If you are in Windows run the build.bat file in the root
directory of the project, otherwise run the build.sh file under Linux or macOS.
Easy Deploy
After building the project, the next step is to deploy the automation to BotCity Maestro.
The easiest way to do your first deployment is through Orchestrator's Easy Deploy feature.
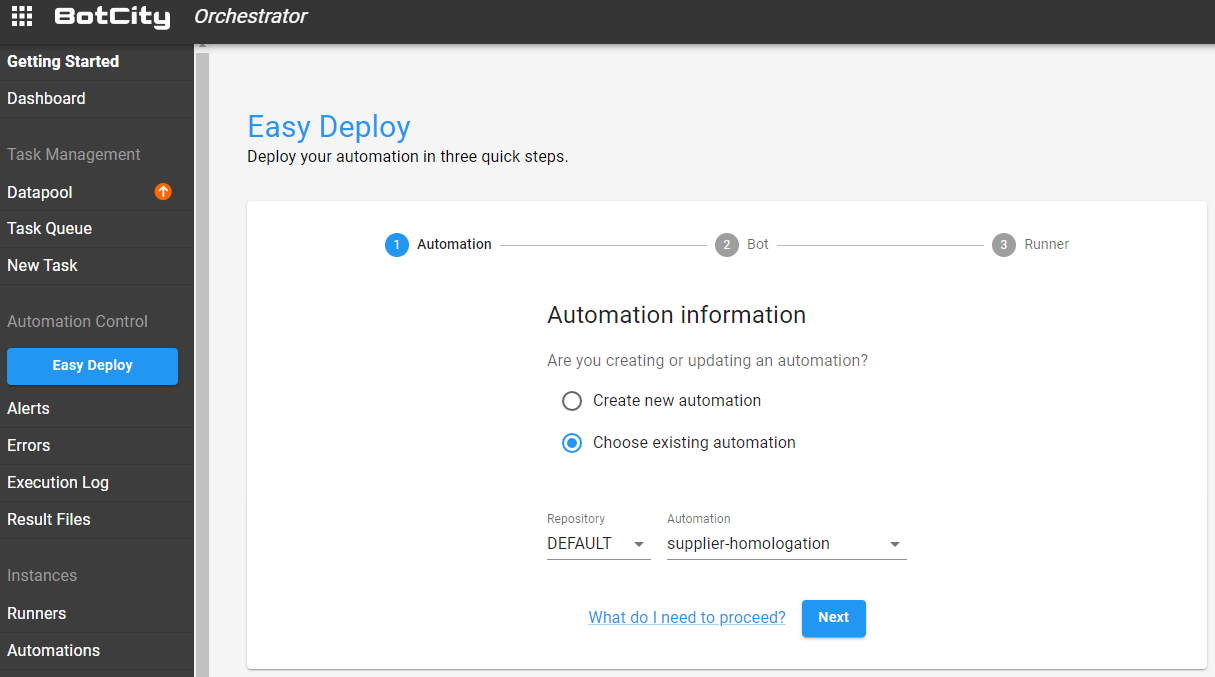
The Easy Deploy process is basically divided into three steps:
- Creating/updating an automation
- Deploying a bot
- Choosing where to run
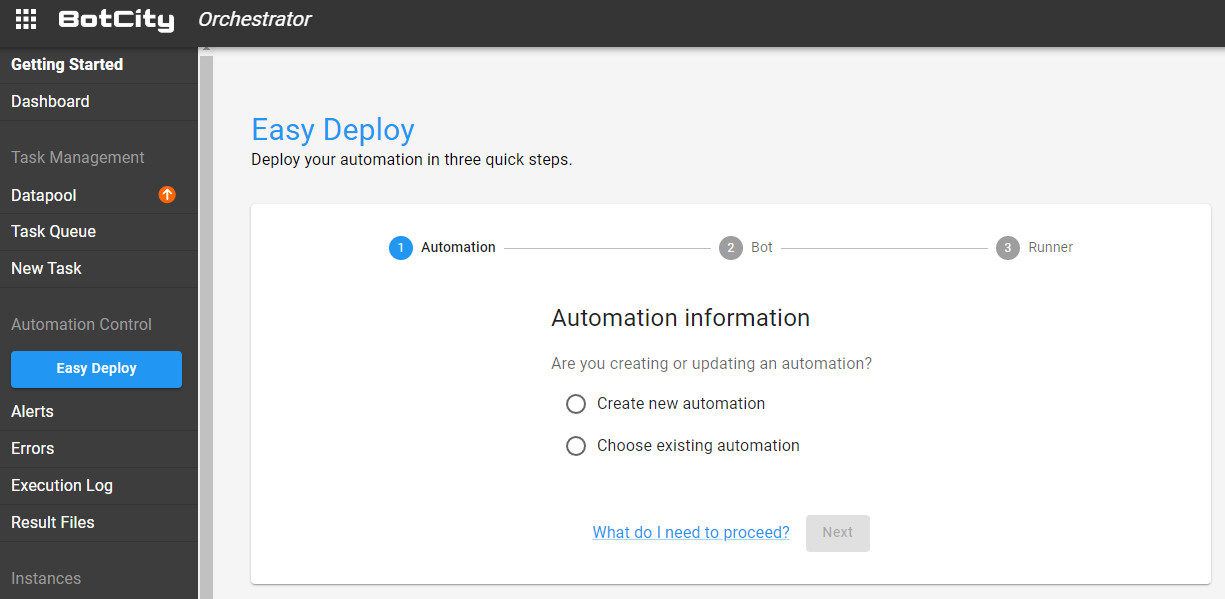
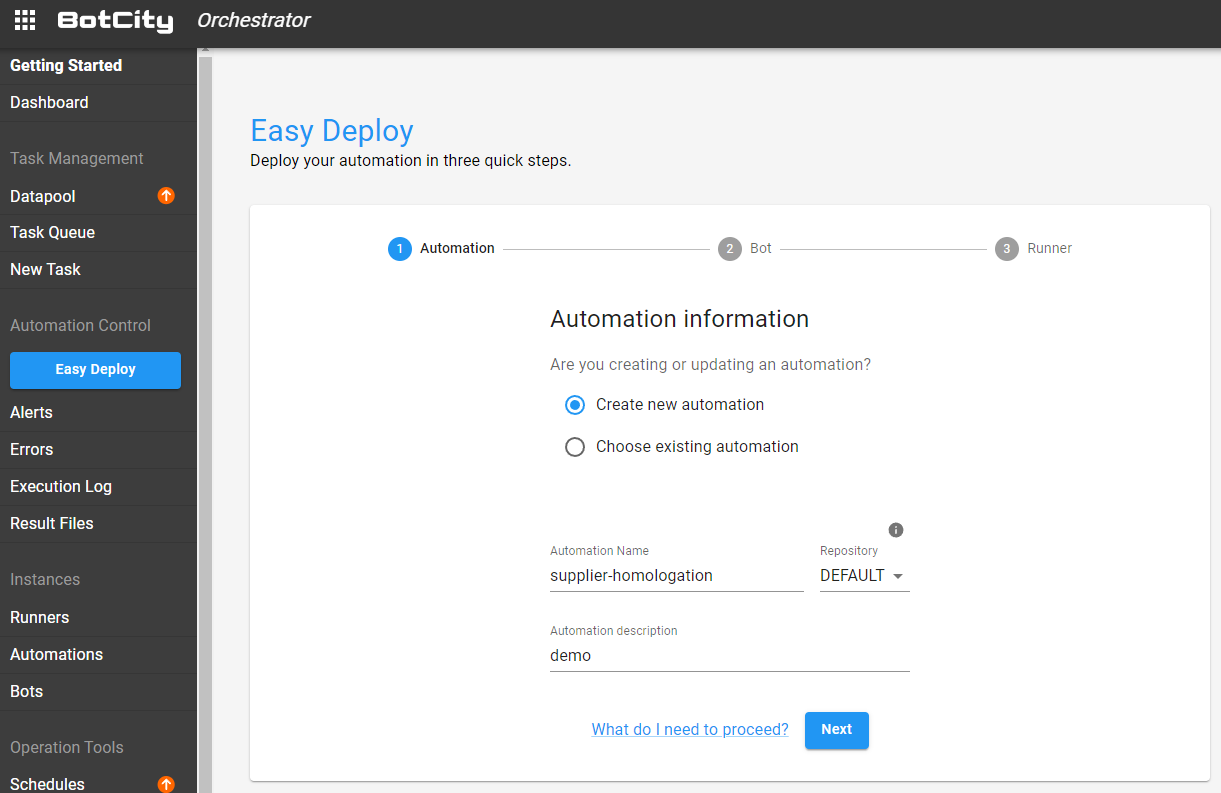
To create an automation from scratch, select the option: Create new automation
First Step - Creating an automation
The first step is to fill in some information about the automation process being created.
Info
See more details about Automations management in this section.
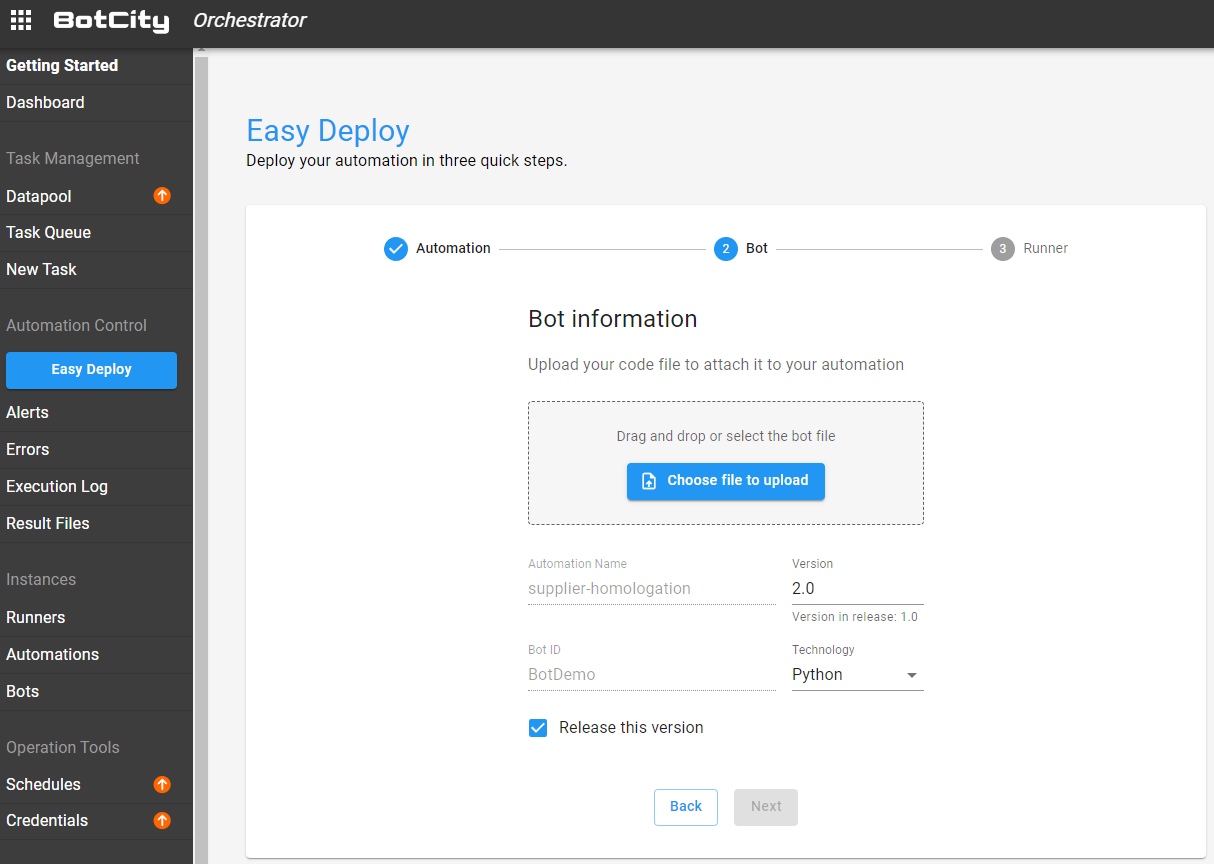
Second Step - Deploying a bot
The second step is to fill in the information regarding your bot.
In this step, you will upload the file related to the robot and define the version, the identifier, and the technology being used.
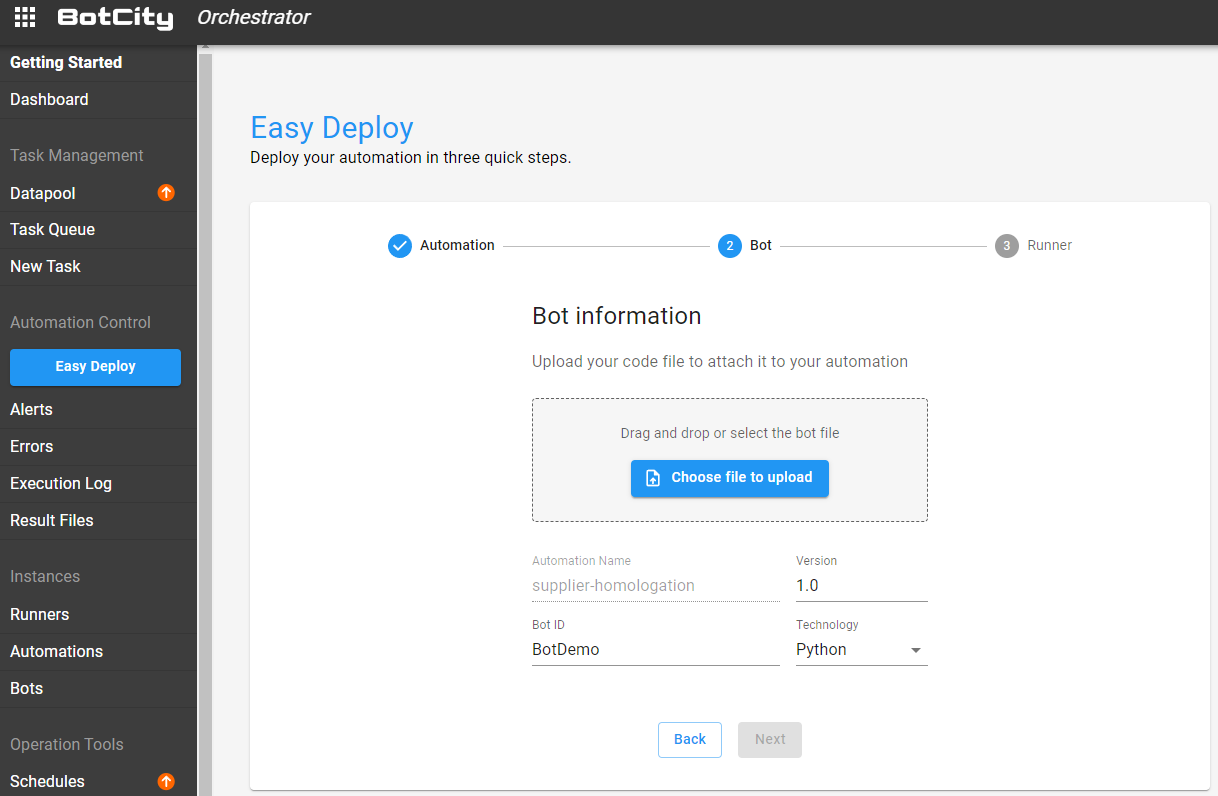
Java project
For Java projects, upload the generated .jar file in the dist/ folder, if it generates two .jar files upload the
file with jar-with-dependencies in the filename.
Python project
For Python projects, upload the generated .zip or .tar.gz file in the dist/ folder.
Javascript project
For Javascript projects, upload a .zip file containing the project files such as the bot.js, resources folder and package.json.
Warning for legacy projects
For Python automations, if you are using a legacy project template, the bot identifier must match the id defined when creating the project.
If the auto-generated name is not the same as the ID of the created project, change it so that the identifiers match.
Basically, the bot identifier appears in the name of the generated .tar.gz file being used.
Final Step - Choosing where to run
The third and final step is to define which Runner will be associated with this automation.
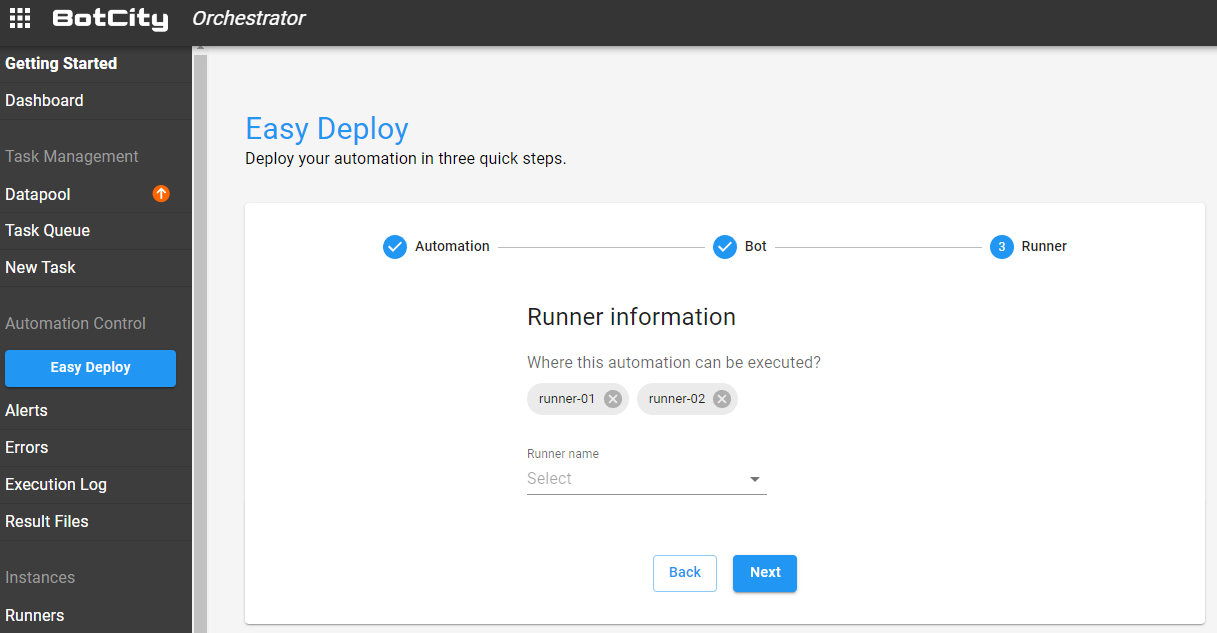
Note
To associate a Runner with automation, it must be properly created and configured on the platform.
See more details on how to create and configure a Runner in the Runners section.
Important
In the file located in conf/conf.bcf of the BotCity Studio SDK, ensure that the Runner ID that will be used corresponds to the Runner linked to the automation.
See more details about the BotCity Studio SDK configuration.
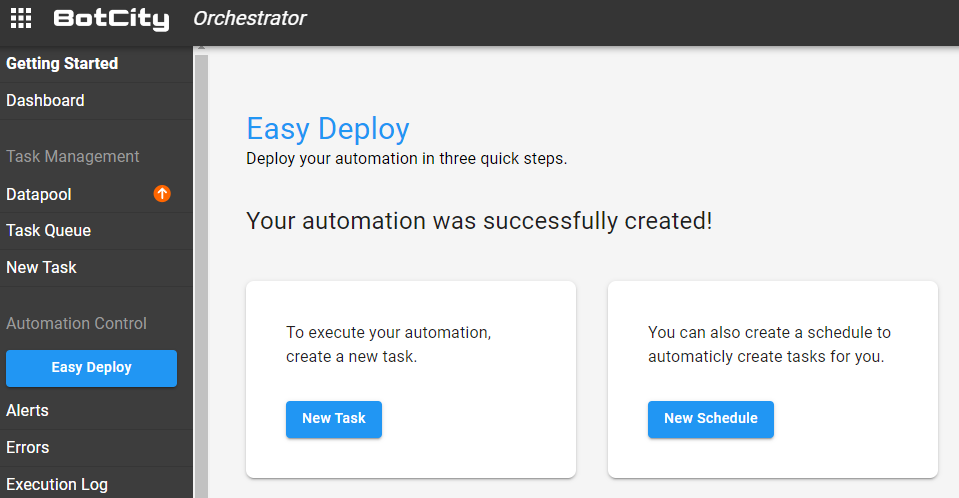
Success 🚀
Congratulations 🏆
In a few seconds, you managed to configure your automation process, associate it with your bot and define where it will be executed.
You now have the option to create a new task or schedule for this automation.
By doing so, a new task will be queued and as soon as the Runner associated with the automation is active
the execution will start automatically.
Over the next sections, we will cover in more detail how to create and execute tasks.
Automation Management via BotCity Orchestrator
The Easy Deploy process is very useful for the first deployment of our automation.
However, at certain times we may need to deploy new versions or update existing versions of our bot associated with our automation.
Through Easy Deploy, we can also update automations that already exist on the platform.
After selecting an existing automation, you can edit the robot and the Runners linked to this process.
Updating your bot
On the screen containing the robot's information, you can update the current version being used or upload a new version.
Just upload the robot file and enter the corresponding version.
If you keep the same version already being used, this new file will overwrite the previously used file.
Tip
If you leave the Release this version option checked, this will be the version used in the next executions of the automation.
Updating Runners
At this stage, you will be able to edit the Runners that are linked to the automation process.
Managing tasks
Tasks are instances of an Automation that are created by the user via the Orchestrator User Interface, BotCity CLI, Maestro SDK or the Orchestrator API.
Task creation page
You can create a task via the task creation page in Maestro.
Just click on the New Task button referring to the automation process you want to execute.
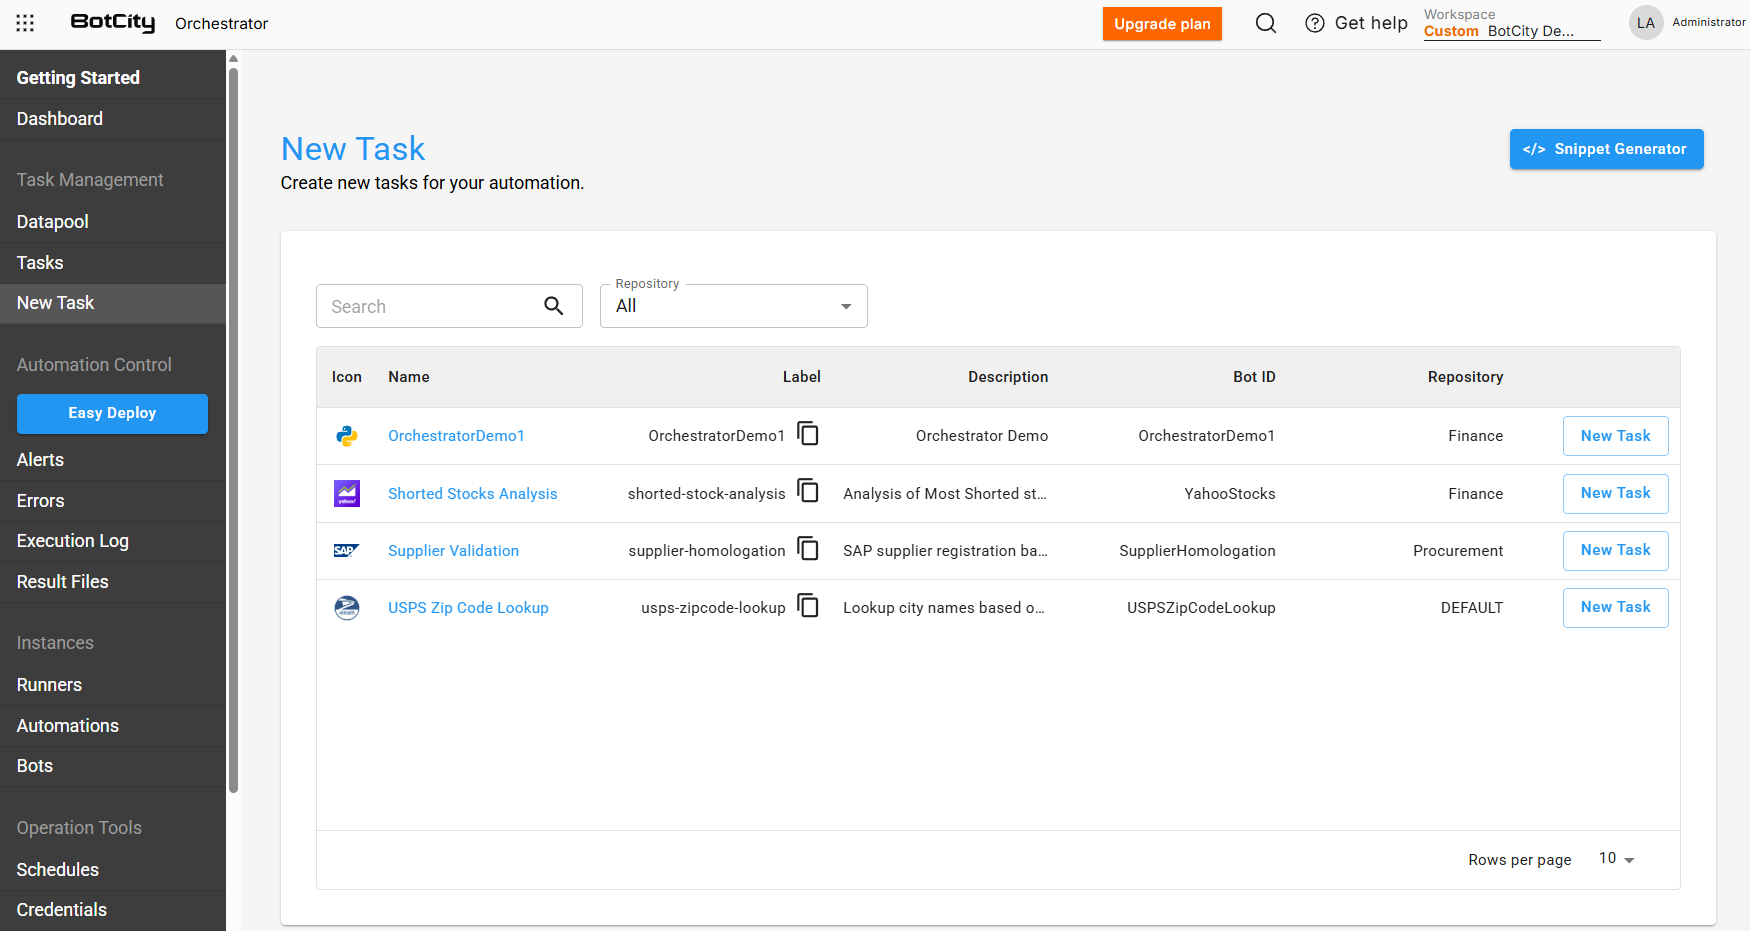
Tip
The Automation created in the Easy Deploy process will be displayed on this page.
Info
See more details about the New Task page in this section.
Executing tasks
After creating a task, it will be sent to the queue and at that moment it will be ready to be executed.
The last necessary step is to activate Runner. Just run the BotRunner or BotRunner-gui script from the BotCity Studio SDK.
Finishing a task
Once tasks are created, they are queued on the Orchestrator and collected for execution by the BotRunner.
There are two ways to finish a task: via code (together with the bot code) or via CLI.
It is the bot developer responsibility to inform the Orchestrator via the Maestro SDK of the proper final status of a task.
Click here to learn how to finish a task using the Maestro SDK.
Info
Finish a task is just one of the possible integrations we can do with BotCity Maestro.
See more details about BotCity Orchestrator integrations in this section.
Tip
Most of the above functionalities can also be done through BotCity Command Line Interface.
See more details about the command lines that can be used.
Troubleshooting
Q: Runner does not run the robot
- Make sure you choose the runner correctly in the automation.
- Check if the SDK configuration is with the correct machineId.
- Make sure you start the runner.
- If you have the runner with GUI, click the "START" button to run the tasks in the queue.
- Open the
log.txtfile in the root directory of the SDK and check if there were any errors. - Make sure the runner is running in the terminal.
- Check that the runner has internet access.