Usando GitHub Actions para actualizar tu Bot
Con GitHub Actions, es posible realizar actualizaciones, implementaciones y lanzamientos automáticos para Orquestador sin procesos manuales.
Repasaremos una guía práctica en esta sección, puedes acceder a más información y detalles en nuestro repositorio.
Si no está familiarizado con GitHub Actions, visite documentación oficial de GitHub.
Configurando el proyecto
Primero necesitas crear una carpeta llamada .github en tu proyecto y dentro de ella crea otra carpeta llamada workflows, en esta carpeta se ubicarán los archivos .yml.
La estructura de carpetas debería verse así:
Para leer más sobre cómo crear flujos de trabajo en GitHub Actions, visita la documentación.
Crea tu primer workflow
El primer workflow que crearemos será actualizar un robot existente. Usemos un evento en una rama específica para activar la actualización.
Definiremos:
- Evento:
push - Branch:
main
En otras palabras, cada vez que haya un push en la rama main, se activará el workflow.
Important
En este caso, debe existir una Automatización previamente creada en el BotCity Orquestador.
Sugerencia: realice la primera implementación utilizando la función Easy Deploy.
Capturando el evento definido
Crea un archivo llamado update_bot.yml dentro de la carpeta workflows.
Al principio de este archivo pondremos el nombre del workflow y el evento que definimos, de la siguiente manera:
Generando la compilación del Bot
En este paso, necesitamos como requisito previo un archivo llamado build.sh en la raíz del proyecto que contenga los comandos necesarios para compilar el Bot.
jobs:
update-latest:
name: Update the latest version bot on BotCity Maestro.
# Running the latest version of Ubuntu.
runs-on: ubuntu-latest
steps:
# Checking out the project.
- uses: actions/checkout@v4
# Implemented executable permission to build.sh
- name: Get permission to build.
run: chmod +x build.sh
# Execute the build script to compile the project
- name: Execute to build.
run: ./build.sh
jobs:
update-latest:
name: Update the latest version bot on BotCity Maestro.
# Running the latest version of Ubuntu.
runs-on: ubuntu-latest
steps:
# Install Java
- uses: actions/setup-java@v3
# Checking out the project.
- uses: actions/checkout@v4
# Implemented executable permission to build.sh
- name: Get permission to build.
run: chmod +x build.sh
# Execute the build script to compile the project
- name: Execute to build.
run: ./build.sh
jobs:
update-latest:
name: Update the latest version bot on BotCity Maestro.
# Running the latest version of Ubuntu.
runs-on: ubuntu-latest
steps:
# Checking out the project.
- uses: actions/checkout@v4
# Implemented executable permission to build.sh
- name: Get permission to build.
run: chmod +x build.sh
# Execute the build script to compile the project
- name: Execute to build.
run: ./build.sh
Important
Los pasos descritos se pueden adaptar para cada proyecto, si es necesario agregar más pasos dentro de steps.
Usando una action
Una vez completado el paso anterior, agreguemos la BotCity Action que actualizará el Bot en BotCity Orquestador.
En esta etapa, es necesario configurar las variables de entorno dentro del repositorio en GitHub. Agreguemos las credenciales para acceder al BotCity Orquestador: LOGIN, SERVER y KEY. Puede encontrar esta información en Emb. Desarrollador, dentro de Orquestador.
Advertencia
Configure siempre sus credenciales en los secrets del repositorio por razones de seguridad. No se recomienda pasar esta información directamente en el código.
Con los secretos listos, aún dentro de los steps, agregue la configuración de action:
- name: Using a Botcity action.
# Using the v1.0.6 version of botcity-action-bots
uses: botcity-dev/botcity-action-bots@v1.0.6
with:
# Use the update function.
update: true
# Bot Id in Maestro.
botId: 'example'
# Technology utilized in bot
technology: 'python'
# Path from the root of the project where the generated .zip/.jar will be.
botPath: './bot.zip'
env:
# These secrets must be configured in your repository.
LOGIN: ${{ secrets.LOGIN }}
SERVER: ${{ secrets.SERVER }}
KEY: ${{ secrets.KEY }}
- name: Using a Botcity action.
# Using the v1.0.6 version of botcity-action-bots
uses: botcity-dev/botcity-action-bots@v1.0.6
with:
# Use the update function.
update: true
# Bot Id in Maestro.
botId: 'example'
# Technology utilized in bot
technology: 'java'
# Path from the root of the project where the generated .zip/.jar will be.
botPath: './dist/bot-jar-with-dependencies.jar'
env:
# These secrets must be configured in your repository.
LOGIN: ${{ secrets.LOGIN }}
SERVER: ${{ secrets.SERVER }}
KEY: ${{ secrets.KEY }}
- name: Using a Botcity action.
# Using the v1.0.6 version of botcity-action-bots
uses: botcity-dev/botcity-action-bots@v1.0.6
with:
# Use the update function.
update: true
# Bot Id in Maestro.
botId: 'example'
# Technology utilized in bot
technology: 'javascript'
# Path from the root of the project where the generated .zip/.jar will be.
botPath: './bot.zip'
env:
# These secrets must be configured in your repository.
LOGIN: ${{ secrets.LOGIN }}
SERVER: ${{ secrets.SERVER }}
KEY: ${{ secrets.KEY }}
- name: Using a Botcity action.
# Using the v1.0.6 version of botcity-action-bots
uses: botcity-dev/botcity-action-bots@v1.0.6
with:
# Use the update function.
update: true
# Bot Id in Maestro.
botId: 'example'
# Technology utilized in bot
technology: 'typescript'
# Path from the root of the project where the generated .zip/.jar will be.
botPath: './bot.zip'
env:
# These secrets must be configured in your repository.
LOGIN: ${{ secrets.LOGIN }}
SERVER: ${{ secrets.SERVER }}
KEY: ${{ secrets.KEY }}
Atención
Dentro de con indicamos los parámetros a utilizar, recuerda reemplazar los valores:
botId: ID de tu Bot en BotCity Orquestador.technology: tecnología utilizada en el Bot.botPath: ruta del archivo generado por la compilación.version: la versión del Bot.repositoryLabel: nombre del repositorio del Bot.
Los parámetros son obligatorios en las siguientes acciones:
deploy:botId,technology,botPath,version,repositoryLabeluptade:botId,technology,botPathrelease:botId,technology,botPath,version
Archivo completo
name: Update the latest version of Bot in Maestro.

on:
  push:
    branches:
      - main
jobs:
  update-latest:
    name: Update the latest version bot on BotCity Maestro.
    #  Running the latest version of Ubuntu.
    runs-on: ubuntu-latest
    steps:
      # Checking out the project.
      - uses: actions/checkout@v4
      # Implemented executable permission to build.sh
      - name: Get permission to build.
        run: chmod +x build.sh
      # Execute the build script to compile the project
      - name: Execute to build.
        run: ./build.sh
- name: Using a Botcity action.
# Using the v1.0.6 version of botcity-action-bots
uses: botcity-dev/botcity-action-bots@v1.0.6
with:
# Use the update function.
update: true
# Bot Id in Maestro.
botId: 'example'
# Technology utilized in bot
technology: 'python'
# Path from the root of the project where the generated .zip/.jar will be.
botPath: './bot.zip'
env:
# These secrets must be configured in your repository.
LOGIN: ${{ secrets.LOGIN }}
SERVER: ${{ secrets.SERVER }}
KEY: ${{ secrets.KEY }}
name: Update the latest version of Bot in Maestro.
on:
push:
branches:
- main
jobs:
  update-latest:
    name: Update the latest version bot on BotCity Maestro.
    #  Running the latest version of Ubuntu.
    runs-on: ubuntu-latest
    steps:
      # Install Java
      - uses: actions/setup-java@v3
      # Checking out the project.
      - uses: actions/checkout@v4
      # Implemented executable permission to build.sh
      - name: Get permission to build.
        run: chmod +x build.sh
      # Execute the build script to compile the project
      - name: Execute to build.
        run: ./build.sh
- name: Using a Botcity action.
# Using the v1.0.6 version of botcity-action-bots
uses: botcity-dev/botcity-action-bots@v1.0.6
with:
# Use the update function.
update: true
# Bot Id in Maestro.
botId: 'example'
# Technology utilized in bot
technology: 'java'
# Path from the root of the project where the generated .zip/.jar will be.
botPath: './dist/bot-jar-with-dependecies.jar'
env:
# These secrets must be configured in your repository.
LOGIN: ${{ secrets.LOGIN }}
SERVER: ${{ secrets.SERVER }}
KEY: ${{ secrets.KEY }}
name: Update the latest version of Bot in Maestro.
on:
push:
branches:
- main
jobs:
  update-latest:
    name: Update the latest version bot on BotCity Maestro.
    #  Running the latest version of Ubuntu.
    runs-on: ubuntu-latest
    steps:
      # Checking out the project.
      - uses: actions/checkout@v4
      # Implemented executable permission to build.sh
      - name: Get permission to build.
        run: chmod +x build.sh
      # Execute the build script to compile the project
      - name: Execute to build.
        run: ./build.sh
- name: Using a Botcity action.
# Using the v1.0.6 version of botcity-action-bots
uses: botcity-dev/botcity-action-bots@v1.0.6
with:
# Use the update function.
update: true
# Bot Id in Maestro.
botId: 'example'
# Technology utilized in bot
technology: 'javascript'
# Path from the root of the project where the generated .zip/.jar will be.
botPath: './bot.zip'
env:
# These secrets must be configured in your repository.
LOGIN: ${{ secrets.LOGIN }}
SERVER: ${{ secrets.SERVER }}
KEY: ${{ secrets.KEY }}
name: Update the latest version of Bot in Maestro.
on:
push:
branches:
- main
jobs:
  update-latest:
    name: Update the latest version bot on BotCity Maestro.
    #  Running the latest version of Ubuntu.
    runs-on: ubuntu-latest
    steps:
      # Checking out the project.
      - uses: actions/checkout@v4
      # Implemented executable permission to build.sh
      - name: Get permission to build.
        run: chmod +x build.sh
      # Execute the build script to compile the project
      - name: Execute to build.
        run: ./build.sh
      - name: Using a Botcity action.
        # Using the v1.0.6 version of botcity-action-bots
        uses: botcity-dev/botcity-action-bots@v1.0.6
        with:
          # Use the update function.
          update: true
          # Bot Id in Maestro.
          botId: 'example'
          # Technology utilized in bot
          technology: 'typescript'
          # Path from the root of the project where the generated .zip/.jar will be.
          botPath: './bot.zip'
        env:
          # These secrets must be configured in your repository.
          LOGIN: ${{ secrets.LOGIN }}
          SERVER: ${{ secrets.SERVER }}
          KEY: ${{ secrets.KEY }}
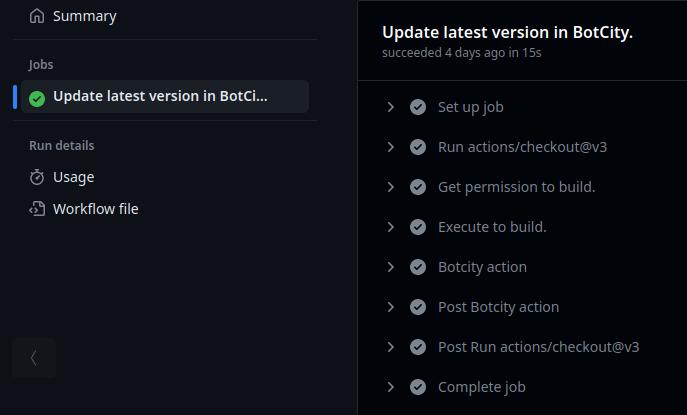
Resultado
Con el archivo listo, activemos el workflow según el evento definido. Ejecute un push en main y vea un resultado similar a este:
Ejecuta un push en la rama main, y el resultado será este:
Creando un flujo de trabajo avanzado para implementar y lanzar tu Bot.
Usando GitHub Actions, puedes crear workflows más avanzados para ejecutar la deploy y el release de tu Bot en BotCity Orquestador. Podemos configurar su activación en función de los distintos eventos disponibles en GitHub.
Como ejemplo, creemos un workflow que se activará cuando se publique un release en GitHub.
Definiremos:
- Evento:
release - Tipo:
[ published ]
Note
Para definir la versión de implementación y la versión del bot en BotCity Orquestador, usaremos la etiqueta de versión. Para comprender cómo crear versiones en GitHub, visite documentación de GitHub.
Capturando el evento de publicación de lanzamiento
Cree un archivo llamado deploy_and_release.yml dentro de la carpeta workflows.
Al principio de este archivo pondremos el nombre del workflow y el evento que definimos, de la siguiente manera:
name: Deploy and Release in from GitHub release

on:
  # Capturing the release publishing event.
  release:
    types: [ published ]
Generando la compilación del Bot
Al igual que anteriormente, necesitamos como requisito previo un archivo llamado build.sh en la raíz del proyecto.
jobs:
  deploy-and-release:
    name: Deploy and release in BotCity.
    runs-on: ubuntu-latest
    steps:
      # Checking out the project.
      - uses: actions/checkout@v4
      # Implemented executable permission to build.sh
      - name: Get permission to build.
        run: chmod +x build.sh
      # Execute the build script to compile the project
      - name: Execute to build.
        run: ./build.sh
jobs:
  deploy-and-release:
    name: Deploy and release in BotCity.
    runs-on: ubuntu-latest
    steps:
      # Installing Java
      - uses: actions/setup-java@v3
      # Checking out the project.
      - uses: actions/checkout@v4
      # Implemented executable permission to build.sh
      - name: Get permission to build.
        run: chmod +x build.sh
      # Execute the build script to compile the project
      - name: Execute to build.
        run: ./build.sh
jobs:
  deploy-and-release:
    name: Deploy and release in BotCity.
    runs-on: ubuntu-latest
    steps:
      # Checking out the project.
      - uses: actions/checkout@v4
      # Implemented executable permission to build.sh
      - name: Get permission to build.
        run: chmod +x build.sh
      # Execute the build script to compile the project
      - name: Execute to build.
        run: ./build.sh
Usando action
En este paso, además de usar las credenciales configuradas en el repositorio como previamente, también usaremos variables de evento de GitHub.
La variable github.event.release.tag_name devuelve el nombre de la etiqueta utilizada al publicar una versión en GitHub.
      - name: Botcity action
        # Using v1.0.6 version of botcity-action-bots
        uses: botcity-dev/botcity-action-bots@v1.0.6
        with:
          # Use deploy and release functions
          deploy: true
          release: true
          # Use tag_name from GitHub release event
          version: ${{ github.event.release.tag_name }}
          botId: 'example'
          technology: 'python'
          botPath: './bot.zip'
        env:
          LOGIN: ${{ secrets.LOGIN }}
          SERVER: ${{ secrets.SERVER }}
          KEY: ${{ secrets.KEY }}
      - name: Botcity action
        # Using v1.0.6 version of botcity-action-bots
        uses: botcity-dev/botcity-action-bots@v1.0.6
        with:
          # Use deploy and release functions
          deploy: true
          release: true
          # Use tag_name from GitHub release event
          version: ${{ github.event.release.tag_name }}
          botId: 'example'
          technology: 'java'
          botPath: './dist/bot-jar-with-dependencies.jar'
        env:
          LOGIN: ${{ secrets.LOGIN }}
          SERVER: ${{ secrets.SERVER }}
          KEY: ${{ secrets.KEY }}
      - name: Botcity action
        # Using v1.0.6 version of botcity-action-bots
        uses: botcity-dev/botcity-action-bots@v1.0.6
        with:
          # Use deploy and release functions
          deploy: true
          release: true
          # Use tag_name from GitHub release event
          version: ${{ github.event.release.tag_name }}
          botId: 'example'
          technology: 'javascript'
          botPath: './bot.zip'
        env:
          LOGIN: ${{ secrets.LOGIN }}
          SERVER: ${{ secrets.SERVER }}
          KEY: ${{ secrets.KEY }}
      - name: Botcity action
        # Using v1.0.6 version of botcity-action-bots
        uses: botcity-dev/botcity-action-bots@v1.0.6
        with:
          # Use deploy and release functions
          deploy: true
          release: true
          # Use tag_name from GitHub release event
          version: ${{ github.event.release.tag_name }}
          botId: 'example'
          technology: 'typescript'
          botPath: './bot.zip'
        env:
          LOGIN: ${{ secrets.LOGIN }}
          SERVER: ${{ secrets.SERVER }}
          KEY: ${{ secrets.KEY }}
Atención
Dentro de con indicamos los parámetros a utilizar, recuerda reemplazar los valores:
botId: ID de tu Bot en BotCity Orquestador.technology: tecnología utilizada en el Bot.botPath: ruta del archivo generado por la compilación.version: la versión del Bot.repositoryLabel: nombre del repositorio del Bot.
Los parámetros son obligatorios en las siguientes acciones:
deploy:botId,technology,botPath,version,repositoryLabeluptade:botId,technology,botPathrelease:botId,technology,botPath,version
Archivo completo
name: Deploy and Release in from GitHub release

on:
  # Capturing the release publishing event.
  release:
    types: [ published ]

jobs:
  deploy-and-release:
    name: Deploy and release in BotCity.
    runs-on: ubuntu-latest
    steps:
      - uses: actions/checkout@v4
      - name: Get permission to build.
        run: chmod +x build.sh
      - name: Execute to build.
        run: ./build.sh
      - name: Botcity action
        uses: botcity-dev/botcity-action-bots@v1.0.6
        with:
          deploy: true
          release: true
          # Use tag_name to release.
          version: ${{ github.event.release.tag_name }}
          botId: 'example'
          technology: 'python'
          botPath: './bot.zip'
        env:
          LOGIN: ${{ secrets.LOGIN }}
          SERVER: ${{ secrets.SERVER }}
          KEY: ${{ secrets.KEY }}
name: Deploy and Release in from GitHub release

on:
  # Capturing the release publishing event.
  release:
    types: [ published ]

jobs:
  deploy-and-release:
    name: Deploy and release in BotCity.
    runs-on: ubuntu-latest
    steps:
      - uses: actions/setup-java@v3
      - uses: actions/checkout@v4
      - name: Get permission to build.
        run: chmod +x build.sh
      - name: Execute to build.
        run: ./build.sh
      - name: Botcity action
        uses: botcity-dev/botcity-action-bots@v1.0.6
        with:
          deploy: true
          release: true
          # Use tag_name to release.
          version: ${{ github.event.release.tag_name }}
          botId: 'example'
          technology: 'java'
          botPath: './dist/bot-jar-with-dependencies.jar'
        env:
          LOGIN: ${{ secrets.LOGIN }}
          SERVER: ${{ secrets.SERVER }}
          KEY: ${{ secrets.KEY }}
name: Deploy and Release in from GitHub release

on:
  # Capturing the release publishing event.
  release:
    types: [ published ]

jobs:
  deploy-and-release:
    name: Deploy and release in BotCity.
    runs-on: ubuntu-latest
    steps:
      - uses: actions/checkout@v4
      - name: Get permission to build.
        run: chmod +x build.sh
      - name: Execute to build.
        run: ./build.sh
      - name: Botcity action
        uses: botcity-dev/botcity-action-bots@v1.0.6
        with:
          deploy: true
          release: true
          # Use tag_name to release.
          version: ${{ github.event.release.tag_name }}
          botId: 'example'
          technology: 'javascript'
          botPath: './bot.zip'
        env:
          LOGIN: ${{ secrets.LOGIN }}
          SERVER: ${{ secrets.SERVER }}
          KEY: ${{ secrets.KEY }}
name: Deploy and Release in from GitHub release

on:
  # Capturing the release publishing event.
  release:
    types: [ published ]

jobs:
  deploy-and-release:
    name: Deploy and release in BotCity.
    runs-on: ubuntu-latest
    steps:
      - uses: actions/checkout@v4
      - name: Get permission to build.
        run: chmod +x build.sh
      - name: Execute to build.
        run: ./build.sh
      - name: Botcity action
        uses: botcity-dev/botcity-action-bots@v1.0.6
        with:
          deploy: true
          release: true
          # Use tag_name to release.
          version: ${{ github.event.release.tag_name }}
          botId: 'example'
          technology: 'typescript'
          botPath: './bot.zip'
        env:
          LOGIN: ${{ secrets.LOGIN }}
          SERVER: ${{ secrets.SERVER }}
          KEY: ${{ secrets.KEY }}
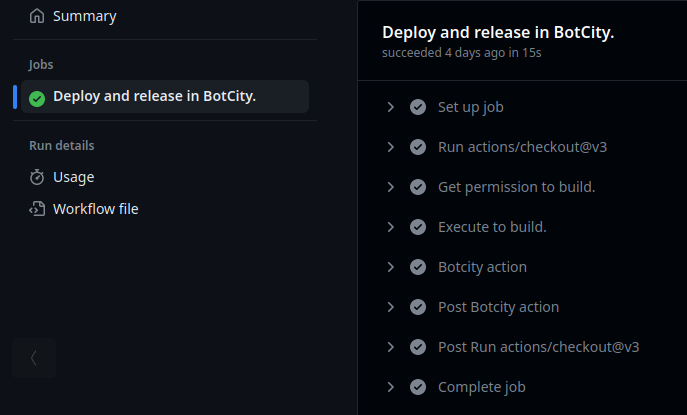
Resultado
Ejecuta la publicación del lanzamiento y el resultado será este:
Utilidades de canalización de CI/CD de BotCity
Esta Guía Práctica se centra en el uso de GitHub Actions, sin embargo existe la posibilidad de utilizar otras tecnologías a través de BotCity CI/CD Pipeline Utilities. Consulte el repositorio para ver ejemplos de integración con GitHub Actions, Azure Pipelines, Woodpecker CI, BitBucket Pipelines, GitLab CI y Jenkins.